You’ve just finished a weekend loop through the Don Valley, but instead of feeling the post-ride glow, you’re nursing a dull ache in your lower back and a sharp twinge in your left knee. It’s a common story for many GTA cyclists who purchased a bike based on a generic height chart rather than their specific biomechanics. Since 2014, we’ve helped riders realize that learning how to choose a bike size shouldn’t feel like a guessing game that leads to a high-ticket mistake.
This 2026 guide is designed to help you master the art of sizing by walking you through a step-by-step measurement process tailored for your unique body. We’ll break down the crucial differences between road and mountain bike geometry, explain how your reach and inseam impact your comfort, and show you how an Expert bike fit can transform your riding experience. Whether you’re commuting along the Waterfront Trail or exploring the Niagara Escarpment, you’ll gain the confidence to find a bike that supports your fitness and your goals.
Key Takeaways
- Learn how to measure your height and cycling-specific inseam correctly to avoid common discomforts like lower back fatigue or numb hands.
- Master the specific steps for how to choose a bike size across different categories, including road bike measurements in centimetres and mountain bike alpha sizing.
- Understand modern sizing innovations like Specialized S-Sizing, which prioritizes your riding style and reach over traditional seat tube lengths.
- Identify practical fit indicators like the one-inch standover rule and toe overlap to ensure your bike remains stable and safe on GTA roads.
- Discover why personal measurements are just the starting point and how an Expert bike fit at our Toronto or Mississauga locations ensures your biomechanics are fully supported.
Why Proper Bicycle Sizing is More Than Just a Number
Understanding how to choose a bike size starts with looking past the seat tube length. It’s about the entire frame geometry and how it supports your biomechanics. When a bike fits well, your power transfers efficiently and you stay comfortable for hours. If the geometry is wrong, you’ll likely feel it in your contact points. Numb hands often result from a frame that’s too long, forcing too much weight onto your palms. Similarly, lower back fatigue usually stems from a cramped cockpit or a reach that’s simply too aggressive for your current flexibility.
Many riders try to compensate for a frame that is too small or too large by making large changes to the saddle or stem. This can create new fit and handling problems. Saddle position should be established primarily around your pedalling position, while stem length and handlebar position can make smaller reach adjustments. A correctly sized bicycle gives you a sound foundation for predictable handling and comfortable positioning.
Comfort vs. Performance: The Sizing Trade-off
Choosing between sizes often involves a trade-off. A smaller frame may feel more compact and manoeuvrable, while a larger frame may provide a longer wheelbase and a more stretched-out position, depending on the model’s geometry. Neither is automatically better. The correct choice depends on the bike’s stack, reach, wheelbase, intended use and your proportions. A frame that is too large can make the controls difficult to reach, while one that is too small can leave insufficient room for a comfortable position. Ride quality depends on the overall design and setup, not simply whether the frame is carbon or aluminum.
The Long-Term Impact on Joint Health
Proper sizing is essential for protecting your body and ensuring longevity in the sport. An incorrectly sized frame or poorly adjusted contact points can contribute to an uncomfortable or unsustainable riding position. Excessive reach, for example, can increase loading on the hands, shoulders and neck, while an inappropriate saddle position can affect how you interact with the pedals. A expert bike fit can help identify these issues and refine the position around your individual needs.
Measuring Yourself: The Three Essential Metrics
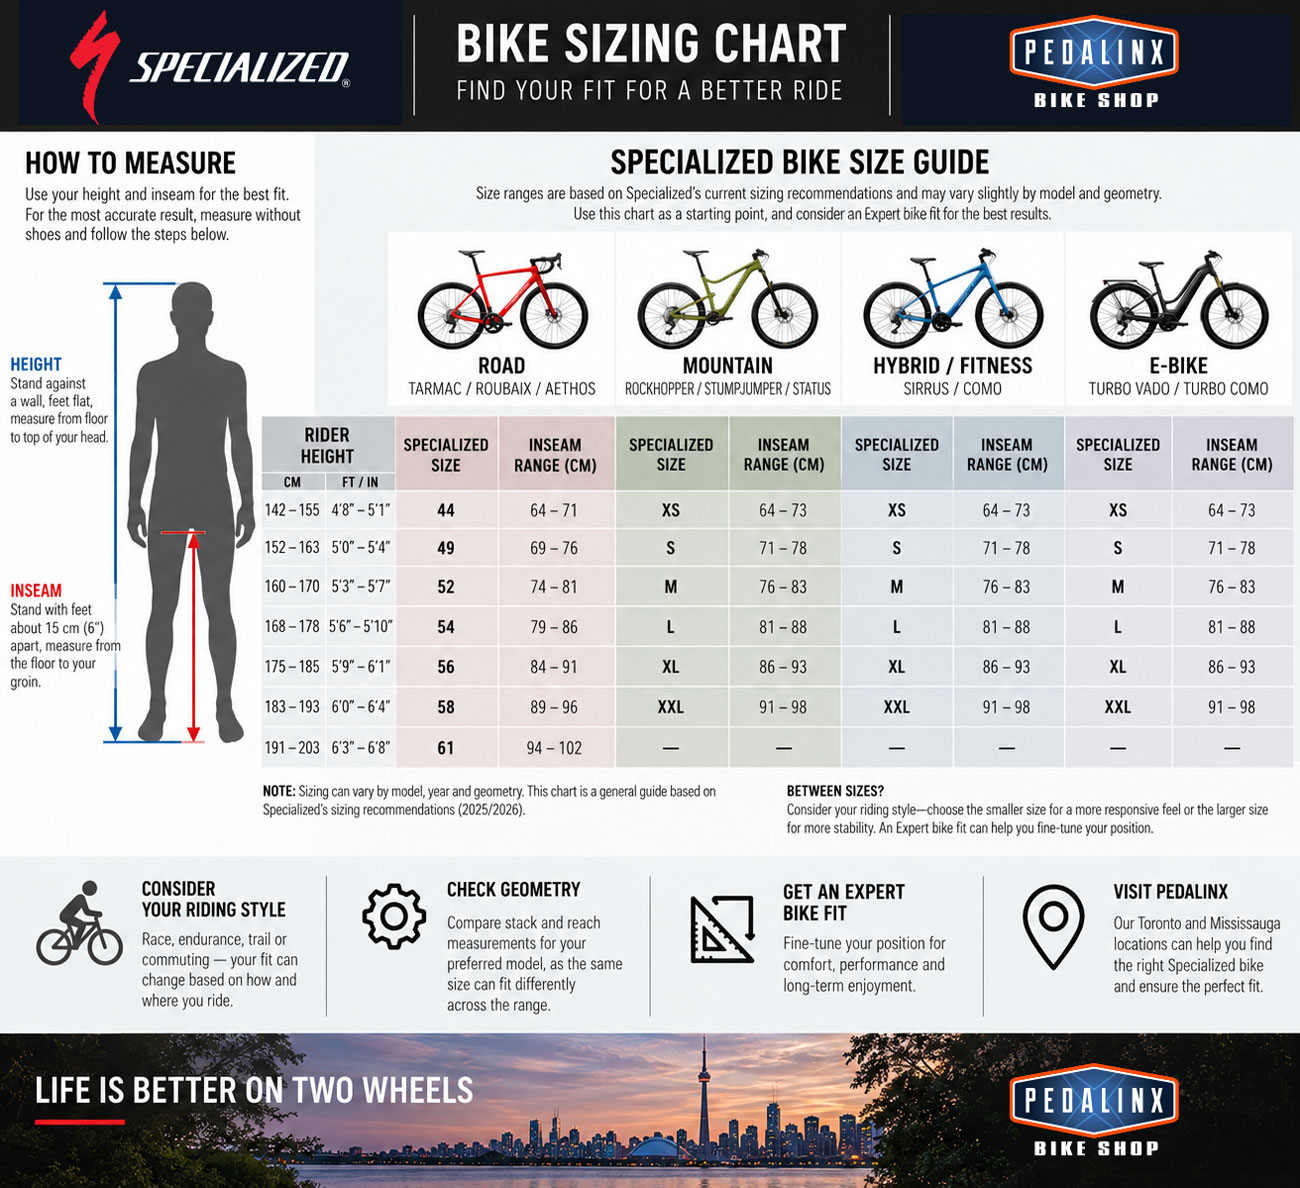
Height alone is a misleading metric. Two people who are 180 centimetres tall can have vastly different leg lengths and arm reaches. To accurately determine how to choose a bike size, you must gather three specific data points. These metrics provide the context needed to read any bike sizing chart with precision rather than relying on guesswork.
Step 1: Measuring Your Total Height
Stand with your back against a flat wall in your cycling socks. Place a straight edge, like a hardback book or a ruler, level across the top of your head and mark the wall. Measure from the floor to that mark. It’s helpful to record this in both centimetres and inches. While many road bike brands use metric sizing, several mountain bike manufacturers still rely on imperial units for their charts.
Step 2: Finding Your True Cycling Inseam
Your cycling inseam is almost always longer than your trouser length. To find it, stand against a wall with your feet about 15 centimetres apart. Place a large book or a spirit level between your legs and pull it up firmly to mimic the pressure of a saddle. Have a partner measure from the top of the book straight down to the floor. This measurement is useful when comparing your proportions with a frame’s geometry and standover measurement. You can find more details on how to measure yourself for a bike to ensure you have enough clearance when straddling the frame.
Step 3: Calculating Your Ape Index for Reach
If you find yourself stuck between two sizes on a chart, your arm length is often the deciding factor. Measure your wingspan from fingertip to fingertip with your arms outstretched. Subtract your total height from this number to find your Ape Index. A positive or negative ape index can provide useful context when comparing your proportions with a manufacturer’s sizing chart, but it should not determine frame size by itself. Torso length, arm length, inseam, flexibility, riding position and the manufacturer’s geometry should all be considered when choosing between sizes. Understanding these proportions can help you interpret a bike sizing chart more effectively. If you want to be certain about your measurements, you can always stop by our Toronto or Mississauga stores for a quick measurement review.
Understanding Bike Geometry: Stack, Reach and Wheelbase
Once you have your basic measurements, the next step is understanding the geometry numbers on a manufacturer’s chart. Frame size labels such as Small, Medium or 54cm are useful starting points, but they do not tell the whole story.
Stack and Reach
Stack describes the vertical position of the front of the frame relative to the bottom bracket, while reach describes its horizontal position. Together, they provide a useful way to compare the riding position of different frames. A bike with more stack generally places the handlebars higher, while more reach generally creates a longer cockpit.
Wheelbase and Overall Geometry
Wheelbase, head-tube angle, seat-tube angle and fork geometry also influence how a bicycle handles. A longer wheelbase can contribute to stability, while a shorter wheelbase may feel more responsive. These characteristics should be considered alongside your riding style rather than treated as automatic indicators of a better or worse fit.
How Specialized S-Sizing Works
Specialized S-Sizing is a style-specific sizing system developed primarily for trail mountain bikes. Unlike traditional Small, Medium and Large sizing, which uses rider measurements such as height and inseam as the main starting point, S-Sizing gives riders more flexibility to choose a bike based on how they want the bike to handle.
Specialized explains that a rider around 5’8″ may be able to ride more than one S-Size. The middle option is intended to provide a balance of manoeuvrability and stability, while choosing a smaller size can create a more nimble feel and choosing a larger size can provide greater stability at speed. The exact size options and rider-height ranges vary by model, so the current Specialized sizing chart for the specific bike should always be the starting point.
What Changes Between S-Sizes?
One important difference between S-Sizes is reach. On Specialized models using S-Sizing, moving to a larger S-Size generally increases reach and wheelbase while maintaining other important geometry characteristics. This gives riders meaningful differences in how the bike fits and handles rather than simply changing the seat-tube length. For example, Specialized’s Demo geometry shows increasing reach and wheelbase across S2, S3 and S4 sizes.
This is why S-Sizing should not be treated as simply choosing a bigger or smaller version of the same fit. The choice can influence the bike’s stability, manoeuvrability and available cockpit space. Your height and inseam remain useful starting points, but your riding style and the specific model’s geometry are also important.
Which S-Size Should You Choose?
- Choose the smaller S-Size when the model’s sizing range allows it and you want a more nimble, responsive feel.
- Choose the middle S-Size when you want a balanced combination of manoeuvrability and stability.
- Choose the larger S-Size when you prefer greater stability at speed and a longer-feeling bike.
These are general characteristics, not universal rules. The correct choice depends on the specific Specialized model, your body proportions, riding position and the type of terrain you ride. A test ride and an Expert bike fit can help confirm the best option.
Important: S-Sizing is not used across every Specialized bicycle. Some Specialized models use traditional numeric or Small-to-XL sizing instead. Always use the current sizing information and geometry chart for the exact model you are considering. For example, Specialized’s Epic Expert is listed in XS through XL rather than S2-S6, while other Specialized trail models use S-Sizing.
Sizing by Category: Road, Mountain, and E-Bikes
Measurement conventions shift depending on the style of riding you plan to do. Road bikes are typically sized in centimetres, traditionally based on seat tube length. In contrast, mountain bikes use alpha sizing, such as Small, Medium, or Large. However, modern brands like Specialized have introduced “S-Sizing” to simplify how to choose a bike size. Instead of relying primarily on traditional seat-tube length, Specialized’s S-Sizing system uses modern frame geometry and rider height ranges to offer different reach and wheelbase characteristics between sizes. Depending on the model and rider’s preference, size selection can influence whether the bike feels more nimble or more stable. Comparing the manufacturer’s geometry is essential for ergonomics and injury prevention.
Road Bike Sizing (Specialized)
A 54cm frame from one brand doesn’t always match a 54cm from another. Endurance geometry, found on many Specialized bikes, features a taller head tube to keep you more upright. This is often better for handling the variable pavement and potholes found on GTA roads. Race geometry is designed for a lower, more aerodynamic profile. If you’re stuck between sizes, consider your flexibility and how long you intend to spend in the saddle during a single trip. A bike that’s too long will quickly lead to shoulder strain on the Waterfront Trail.
Mountain Bike Sizing (Marin and Specialized)
For modern mountain bikes, reach is one of the most useful geometry measurements to compare between sizes. It describes the horizontal distance from the bottom bracket to the head-tube reference point and helps indicate how much room you have to move when standing on the pedals. Stack, wheelbase, seat-tube angle and suspension design also affect how a mountain bike fits and handles. Brands like Marin bikes may use different conventions for their aggressive hardtails compared to their full-suspension models. A longer reach provides more stability at high speeds, while a shorter reach makes the bike easier to flick around tight corners. Check the manufacturer’s standover measurement and make sure you have appropriate clearance for the bike and the way you ride. There is no universal two-inch rule for every modern mountain bike because frame shapes, suspension travel and top-tube designs vary.
Electric and Hybrid Bike Considerations
E-bikes and hybrids often mirror commuter geometry, prioritizing an upright position for better visibility in Toronto traffic. Because e-bikes carry extra weight from the motor and battery, a slightly smaller frame can sometimes be easier to manage during low-speed manoeuvres. Consider how the battery placement affects how you mount and dismount, especially if you prefer a step-through frame for convenience. To see how these different geometries feel in person, visit our Toronto or Mississauga showrooms to test ride various categories. For younger riders, remember that children’s bikes are sized by wheel diameter rather than frame height, starting from 12-inch balance bikes up to 24-inch youth models.
Fine-Tuning Your Fit: The Final Checklist
Once you have your measurements, it’s time to straddle the bike to verify the standover height. Check standover clearance as one part of the fit, but do not rely on a universal one-inch or two-inch rule. Modern frame shapes vary substantially, so compare your clearance with the manufacturer’s geometry and the bike’s intended use. Also check for toe overlap by turning the front wheel with your feet in the normal riding position. Some toe overlap is common on modern bikes and does not automatically mean the frame is too small; it is mainly a consideration during very slow, tight turns.
While the frame is the foundation of how to choose a bike size, components like the stem and seatpost allow for minor refinements. A shorter stem can reduce reach, while adjusting the seatpost ensures your leg extension is efficient and sustainable. These changes should only be used to polish the fit, not to compensate for a frame that is fundamentally the wrong size for your proportions. Since 2014, we’ve seen that getting the frame right from the start is a foundational step for long-term comfort.
The Expert Bike Fit Advantage
Booking an Expert bike fit is a reliable way to finalize your setup. A expert fitter analyzes your sustainable positioning and biomechanics rather than just looking at a static chart. It’s important to understand that a fit doesn’t automatically add power. Instead, it allows you to use your existing fitness effectively by ensuring your joints are properly aligned. During a session, we’ll adjust cleat position, saddle tilt, and handlebar angle to prevent the numbness or fatigue that often ends a ride early.
Testing Your Bike in the Real World
A quick spin in a flat parking lot won’t reveal how a bike handles the steep climbs of the Niagara Escarpment or the rough pavement in downtown Toronto. When testing, pay attention to the stability of the bike. It shouldn’t feel unstable at high speeds, nor should it feel sluggish when manoeuvring around corners. Use the test ride to evaluate fit, handling, braking and shifting. If the drivetrain makes unusual noise, skips under load or shifts poorly, have the drivetrain inspected rather than assuming the problem is related to frame size. Choosing the right bike size should end with a thorough test ride and a final fit check. Visit us in Toronto or Mississauga to get an expert evaluation and ensure your next bicycle is a match for your riding goals.
Start Your Next GTA Adventure with the Right Fit
Mastering how to choose a bike size is the difference between a ride that ends in an ache and one that feels effortless. You’ve learned that height is only the starting point. By measuring your cycling inseam and reach, you can navigate brand-specific charts for Specialized and Marin with confidence. Whether you’re eyeing a road bicycle for the Don Valley or a mountain bike for local trails, understanding geometry ensures you stay in a sustainable position.
Since 2014, we’ve served the GTA community by pairing riders with the right equipment. As an authorized dealer for Specialized and Marin, our showrooms feature the latest 2026 models ready for testing. Our on-site expert mechanics are here to help you dial in every detail. Visit Pedalinx in Toronto or Mississauga for an Expert bike fit today! We’ll help you find a bike that supports your goals and keeps you riding comfortably for years to come.
Frequently Asked Questions
Can I use my height alone to determine my bike size?
Height is just one part of the equation when learning how to choose a bike size. Your leg length and arm reach are far more important for finding a comfortable position. Since 2014, we’ve seen many riders who share the same height but require different frame sizes due to their unique proportions. Relying on height alone often leads to a bike that feels too long or too short, which can cause joint pain during long rides.
What happens if I am between two bike sizes?
If you fall between two sizes, your arm length and riding preference will decide the winner. A smaller frame generally offers more agility for technical cornering, while a larger frame provides better stability for high-speed descents. You should check your Ape Index by comparing your wingspan to your height. If your arms are long, the larger size is usually better. We recommend visiting our Mississauga or Toronto shops for an Expert bike fit to confirm the best choice.
How do I measure my inseam for a bicycle?
Measuring your cycling inseam requires a spirit level or a large book and a flat wall. Stand with your feet 15 centimetres apart and pull the book up firmly against your pelvic bone to simulate saddle pressure. Measure the distance from the top of the book straight down to the floor. This measurement is more useful than trouser size when comparing your proportions with a manufacturer’s sizing information and checking frame clearance.
Is road bike sizing the same as mountain bike sizing?
Road and mountain bike sizing systems are completely different. Road bikes typically use centimetres, while mountain bikes use alpha sizing like Small or Medium. Modern mountain bikes from brands like Specialized also use S-Sizing, which prioritizes reach and wheelbase over seat tube length. When you’re figuring out how to choose a bike size, always check the specific geometry chart for the category you’re interested in, as a “Medium” trail bike won’t feel like a 54cm road bike.
Does a carbon frame fit differently than an aluminum frame?
A carbon frame doesn’t inherently fit differently than an aluminum one, as the geometry remains the primary factor. While some people believe carbon is always more comfortable, ride quality actually depends on frame design, tire pressure, and saddle choice. If the geometry is identical, you should ride the same size regardless of the material. The goal is to find a frame that supports your biomechanics, whether you’re commuting in Etobicoke or exploring the Niagara Escarpment on a high-end road bicycle.
Why does my back hurt even though the bike chart says I have the right size?
Bike charts provide a general range based on averages, but they don’t account for your flexibility or previous injuries. Back pain often stems from an incorrect reach or a saddle that isn’t at the right height for your leg extension. Even if the frame size is technically correct, your handlebar tilt or cleat position might be working against your body. An Expert bike fit can help you use your existing fitness effectively by fine-tuning these critical contact points for long-term comfort.